Let’s make jewellery

Paper Beads are so easy to do all you have to decide is how many strings of them to make, different sizes and what you might add. I think I got inspired by the necklaces Prue Leith wears on GBBO!!!!!! Big , bold and colourful.

Ok so let’s get started. You will need pages from magazines, scissors, string and glue. Also a pencil to make your beads on. You could use anything for this as long as you can thread the beads.

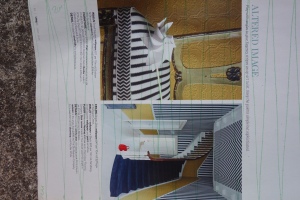
The sheets you choose will determine the colour of your beads.

I chose a sheet and on the back of it marked 2 cms along the top and on the bottom 1cm and then 2 cms along. So the point of your triangle is half way.So whatever size you choose the opposite end needs to be halfway. Try experimenting with different sizes wider, shorter ,longer etc.

So now you have lots of very long triangles ready to be made into beads.

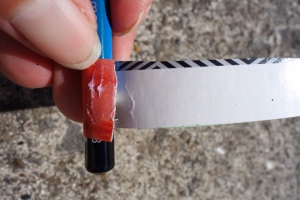
Ok so now you are going to wrap the triangle around the pencil. Put some glue on the start and then start wrapping around.If you wrap too tight you might find it difficult to remove from pencil and if you are too loose they won’t hold their shape very well. As you wrap add a little glue here and there to keep it in place.

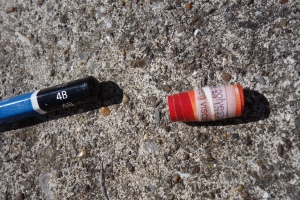
You are now at the end so glue last bit down. Gently remove from pencil.

So you now have your first bead!!!! yay!!! So now just repeat. Don’t forget when you are wrapping try to keep the bit you are wrapping central as much as possible.

So you have made lots of beads. Thread with string, thread, yarn etc. DON’T forget to tie the necklace or the beads will fall off. I have made this mistake before.You could make different lengths, make lots of them to make more volume. You can now add, if you want to, extra bits. I wanted to make a big statement so I needed a bit of cardboard ( pizza base) and some acrylic paint.

So I just splurged some paint down as I like abstract paintings.

I cut a shape out but felt still too big so I cut it down again.

I felt it needed something else so I scrunched up some Easter egg foil.

Thought about adding some bits of the magazine.

She is at it again!!!!!! ” Mine all mine” !!!!!

In the end I used the piece I had cut off as I liked the shape it made and glued it on top. So have fun making yours and even if you don’t want a necklace a grown up, a neighbour etc might love to get one as a gift. I would love to see your work. I am on Instagram readysteady_glue ( there is just 2 photos on there! ) so if you know how to put your images on that please do as I would love to see your work.

A dream Catcher

Last day of the week and the sun has come out for us. This is a paper plate dream catcher. There are hundreds of ‘How To’ but this is the one I did for a birthday a few years ago. Most of the mums ended up doing them with instructions of colour choices etc of the children!!

You will need a paper plate and a hole puncher. Cut out the circle that is already there for you on a paper plate.Make as many hole punches as you like . I have done 6.
You will need some thread or wool. Beads if you have for later.
If you are painting your plate I would do this next and let it dry. If you are going to use soft pastels I would leave till the end so you don’t get covered in them. So next you need to thread through the top of your plate and then you are going to loop through each hole.
Unfortunately thread and cats equal slight disaster!!!!
So once all the way round instead of through the holes you want to loop the thread at the bottom of each triangle and you keep doing that till the end.
Due to cat I accidentally missed out a triangle so it ended up like this. I like mistakes so put the thread through the hole nearest and now just need to add any finishing touches.

So here is one I made at a birthday with more time and no cat !!! So you can see how intricate it can be . I have added some stickers, beads and some paper shapes ( from the left over piece of the paper plate). You can embellish with paper feathers, pom moms, beads etc etc. Have fun and have a lovely weekend, hopefully crafting!!

Books to read

In general I do choose books by their covers. When my son was small there was a great book scheme in Wales and every child was given a book at a certain age which was fantastic. We got ‘You Choose’ by Pippa Goodhart,I would never have chosen this book but my son loved it and would spend ages choosing his favourite picture in each section and wanting to talk about that choice etc. I would highly recommend this book for little ones.

This next book I did choose for the cover!!!! Wed Wabbit by Lissa Evans. We read this when it came out in PB last year. I found this book hilarious, totally original and has a good moral. The main character Fidge , who is not likeable and her equally unlikeable cousin are propelled into a crazy world . I don’t want to give anything away but if you have watched The Princess Bride, like the priest in that , there is a character who can’t pronounce the letter ‘r ‘. Plus there is rhyming going on!! We absolutely loved this book.

If you do buy books please support your local independent book store.My local bookstore is Griffin Books in Penarth and if you are local they are delivering free within Penarth ( £3 p+p beyond).If you do read ,or have read either books please let other people know what you think of them in the comments box.

Let’s play a game

Last year I had the amazing privilege of working on a project as a Creative Practitioner in a school in Swansea. The first thing I did with the children was play this game.I was very surprised that in a very large group hardly anyone had played this before.I have to say they loved seeing the finished results, there was a lot of laughing at some of the outcomes!

It is the Victorian parlour game ‘ Consequences’. Originally the paper would have been folded and passed around but I prefer to cut the sheet of paper into 3. This way you can swap them around if you do lots or can make into a flip book . If eventually you want to make a flip book you need to mark the neck and waist in the same place every time.

1 ) you need to fold your piece of paper into 3. 2)Once folded you need to mark two lines to form the neck which has to be seen on the top and middle piece. 3) You need to mark two lines on the middle and lower pieces for the waist.
So you have now cut the sheet in 3. You can see the neck to draw your head-on to. The more detail the better. It can be a person, animal, monster etc. Has the monster got a hat on etc etc
So the middle section you can see where the neck is and the waist. So you are drawing the body !What outfit is your character wearing?
Last of all the legs or tentacles or whatever you can imagine!!!! Obviously you can see with the two lines where the waist starts.
This is one we did this week. As it is just me and my son someone has to do head and legs.If there are a few of you get everyone involved.The more detail etc you put in the better the outcome.I love playing this game so hope you have fun drawing lots of crazy characters.

Let’s make some noise!!!!

Actually it’s not that noisy!!! Morning Campers , it is a rubbish day outside though our plants will be happy. This is a beyond easy craft, we were shown how to make one several years ago and we then shared our knowledge as a craft on one of my son’s birthdays. Everybody loved making them and probably drove their parents crackers by the end of the day!! So let’s get started to make a Clacker.

You will need a beer bottle top, some string, a good sized bead and an elastic band.

This is all you need.
You need to cut the elastic band and thread both the string and the elastic band through the bead.
You are going to tie the elastic band at the top with the bead directly underneath.
Elastic band knot at the top
Our piece of string was about 15″ long. Tie a knot by the bead to secure it and then you want to make knots at even space the length of the string. These are what is going to make the Clacker ‘Clack’.
Here is my assistant showing you how you pull down on the string. It doesn’t matter if your two fingers are straight out or bent like this. You pull down and every time you go over the knot the bead will hit the bottle top and make a noise. So when you go down there should be one clack after another. Hope that made sense . Have fun !

Let’s Play

Hello!!!!! Are you……at home…..not allowed out….wanting to do something creative? What a coincidence!!!! Me too!While we are indoors I will post Monday to Friday something creative for you to do . Hope you enjoy.

A BOARD GAME

My son’s school gives out Family projects once in a while and this one to make a board game was something we put a lot of effort into and still play. The one we did had to be based on something Victorian, so the game was based on a game called The victorian bicycle game. You will have all seen/ played a game like this as it’s a very simple premise. Roll the dice to get to the end but if you land on a certain place you could go back, forward etc just like snakes and ladders. Because it’s a simple style you can adapt it to any theme. As I said ours was Victorian books and so we did some research on that and added some info cards. So if there is a subject your child is interested in this is a great way of getting them to think about the info they want to research, draw, include etc. We made the moving pieces out off Fimo, but cardboard/paper pieces will work or anything else you can find.

I started this blog last year , I am not very savvy so I am afraid this is as simple as a blog can get !!! But hopefully you will find some creative things to do here and hopefully I will get better at the blog! It is aimed at children but there is no age limit to being creative and it is very good for your mental health.So hope you enjoy creating with me. Hope you are all safe x Emma

So let’s start. Here is the board game we made. I made the snake pattern and everything else my son did.Very much a collaboration.

This Board is 2 cm x 58 cm
I made all the pieces out of Fimo , clearly not a Fimo master. You can use anything you can find.
And find some dice!
Made a very simple pouch out of fabric and some ribbon to keep all the pieces.
These are our instructions which you can adapt to your own game
Info cards .I did illustration on one side.
Info on the other.
All you need to do then is play!! As I said we put quite a lot of time and effort into this project. We even read two of the books. Until we started researching it I did not realise that The Wizard of Oz was written in Victorian times.

One of my favourite book series.

I don’t even remember how we found this series but we did and it is the only book my son has ever read on his way to school!! The Strange Case of Origami Yoda by Tom Angleberger.There are 6 books in the series.They are funny because Dwight’s friends are trying to work out if the origami yoda he is bringing to school is all knowledgeable! But it also covers quite a few upsetting issues ( I cried in the second book) like bullying and friendship so it was a great book to read with my son so we talked about the issues brought up while reading.Each book comes with a ‘how to’ origami figure,all Star Wars related which was brilliant fun. Tom Angleberger has a great website to check out in relation to the books. I loved this clever, funny,sad series .

Hobbycraft started their first Paper Craft Design Team 2019 this year.I saw the post for it and thought just go for it Emma.Well I did and I got chosen to be one of four members!!!The last projects have been my favourites as for children.I am on Hobbycraft’s Instagram page this Wednesday .If you want to have a look at them and the ‘how to’ they will be on their blog.

Ferdinand the Fox
Design a site like this with WordPress.com
Get started